These fun Patriotic Star Spangled Brownies are perfect for celebrations! With a rich chocolate base and bright red, white, and blue toppings, they look festive and taste amazing!
Baking these brownies is a blast! I love how I can make them for barbecues or parties and everyone gets excited about the star shape. Plus, they disappear fast—fair warning! 🎉
Key Ingredients & Substitutions
Butter: Unsalted butter adds richness to the brownies. If you’re dairy-free, coconut oil is a great substitute to keep the texture smooth.
Sugar: Granulated sugar is used for sweetness. You can swap half for brown sugar for a deeper flavor, or use coconut sugar for a less processed option.
Cocoa Powder: Unsweetened cocoa powder gives that rich chocolate flavor. Dark cocoa powder can also work well if you prefer a more intense chocolate taste.
Candy Melts: For decoration, blue and red candy melts add fun color. If you can’t find them, use melted colored chocolate or even royal icing for the drizzles.
Sprinkles: These are not just for looks! You can use any fun colors that fit the occasion. If you’re gluten-free, be sure to check the sprinkles for any hidden gluten ingredients.
How Do I Ensure My Brownies Are Rich and Fudgy?
Getting that rich, fudgy texture in brownies is all about balance. Here are some tips to guide you:
- Use melted butter for moisture and richness. Allow it to cool a bit before mixing.
- Don’t overmix your batter; only mix until the dry ingredients disappear to keep them dense.
- Try underbaking just slightly; they’ll continue to cook as they cool down, giving you that perfect gooey center.
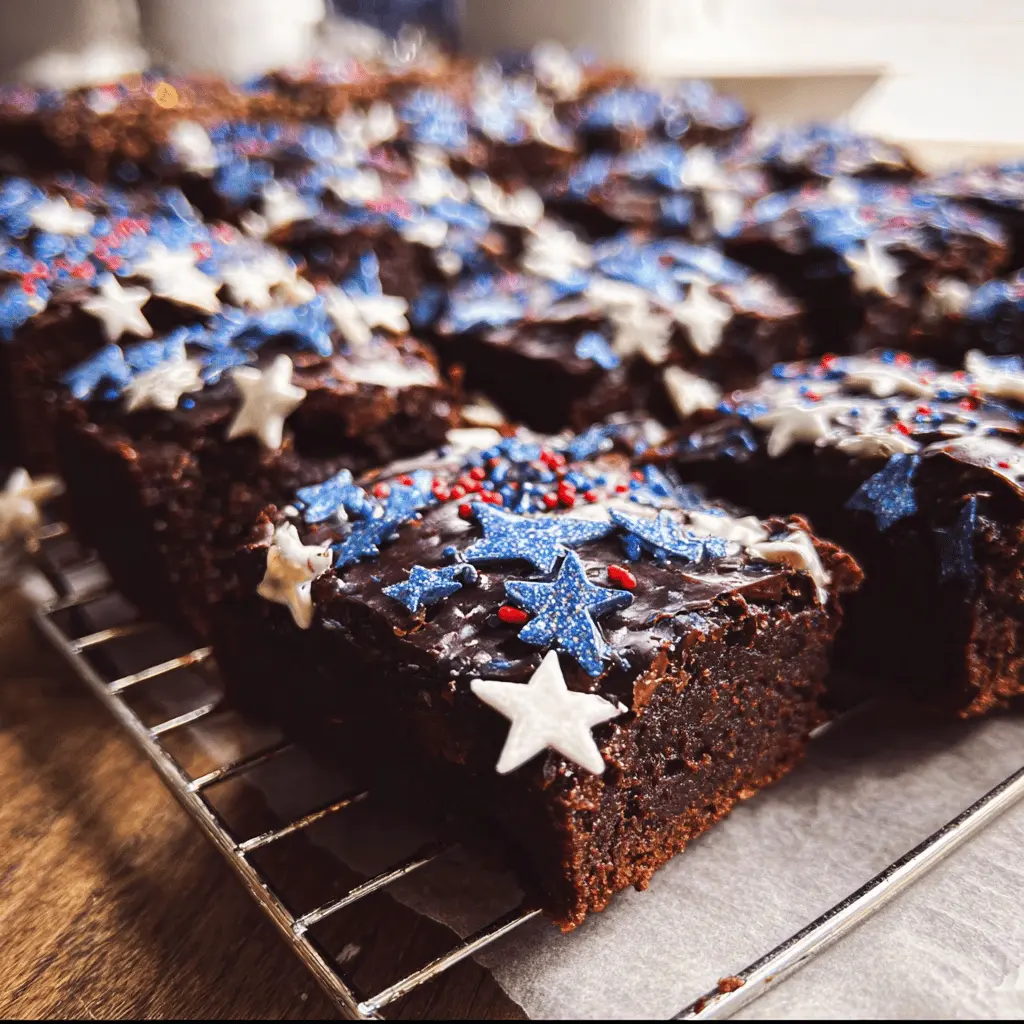
Patriotic Star Spangled Brownies
Ingredients You’ll Need:
For the Brownies:
- 1 cup (2 sticks) unsalted butter
- 2 cups granulated sugar
- 4 large eggs
- 1 tsp vanilla extract
- 1 cup all-purpose flour
- 3/4 cup unsweetened cocoa powder
- 1/2 tsp salt
- 1/2 tsp baking powder
For the Decoration:
- Blue and red candy melts or colored white chocolate melts
- Red, white, and blue sprinkles (various shapes and sizes)
- Non-stick cooking spray or butter for greasing pan
How Much Time Will You Need?
This recipe takes about 15 minutes to prep and 25-30 minutes to bake. Don’t forget to factor in cooling time! You’ll want to let the brownies cool completely before cutting them into stars—about 30 more minutes. So overall, aim for 1 hour and 15 minutes total before serving.
Step-by-Step Instructions:
1. Preheat and Prepare:
Start by preheating your oven to 350°F (175°C). Grease a 9×13-inch baking pan with butter or non-stick cooking spray to ensure your brownies come out easily later.
2. Melt the Butter:
In a microwave-safe bowl, melt the butter completely. This will add a rich flavor to your brownies. Let it cool for a few minutes while you get the mixing bowl ready.
3. Mix the Wet Ingredients:
In a large mixing bowl, whisk together the sugar, eggs, and vanilla extract until the mixture is smooth and creamy. This step is crucial for getting that lovely sweet flavor throughout the brownies.
4. Combine Mixtures:
Now, stir the melted butter into the sugar and egg mixture, mixing until everything is combined nicely.
5. Mix the Dry Ingredients:
In another bowl, sift together the flour, cocoa powder, salt, and baking powder. Sifting helps prevent lumps in your batter.
6. Combine Wet and Dry:
Gradually add the dry mixture into the wet mixture. Use a spatula to gently fold everything together. Be careful not to overmix; it’s okay if there are a few small lumps!
7. Bake the Brownies:
Pour the brownie batter into your prepared pan and spread it out evenly. Bake them in the preheated oven for 25-30 minutes. Check with a toothpick; it should come out with a few moist crumbs but not wet batter.
8. Cooling Time:
Once baked, remove the brownies from the oven and allow them to cool completely in the pan on a wire rack. This is crucial for getting clean cuts when you shape them into stars.
9. Cut into Stars:
Once cooled, use a star-shaped cookie cutter to cut your brownies into festive star shapes. Yum!
10. Melt and Drizzle:
In separate bowls, melt the blue and red candy melts according to the package instructions. Use a spoon or piping bag to drizzle the melted candy over the star-shaped brownies in a fun design.
11. Add Sprinkles:
While the candy melts are still soft, sprinkle the red, white, and blue sprinkles over the brownies. This adds a festive touch!
12. Final Set:
Let the decorated brownies sit at room temperature for about 30 minutes to allow the melted candy to harden.
13. Serve and Enjoy:
These festive brownies are now ready to serve! Perfect for any Fourth of July celebration or patriotic gathering. Enjoy the deliciousness!

Frequently Asked Questions (FAQ)
Can I Use a Different Pan Size?
Yes, you can! If you use a smaller pan, like an 8×8-inch, your brownies will be thicker and may require a few extra minutes of baking time. If using a larger pan, like a 9×13-inch, keep an eye on them as they may bake faster.
How Can I Store Leftover Brownies?
Store any leftover brownies in an airtight container at room temperature for up to 3 days. If you want to keep them longer, they can be refrigerated for up to a week or frozen for up to 3 months. Just make sure to wrap them tightly in plastic wrap before freezing!
Can I Make These Brownies Gluten-Free?
Absolutely! Substitute the all-purpose flour with a 1:1 gluten-free baking mix. Just make sure to check that your chocolate melts and sprinkles are also gluten-free, as some brands may contain gluten.
What Kind of Candy Melts Can I Use?
You can use any color candy melts or colored white chocolate melts for the drizzle! Feel free to mix it up with other colors to match different celebrations—like pastel colors for Easter or team colors for game day!